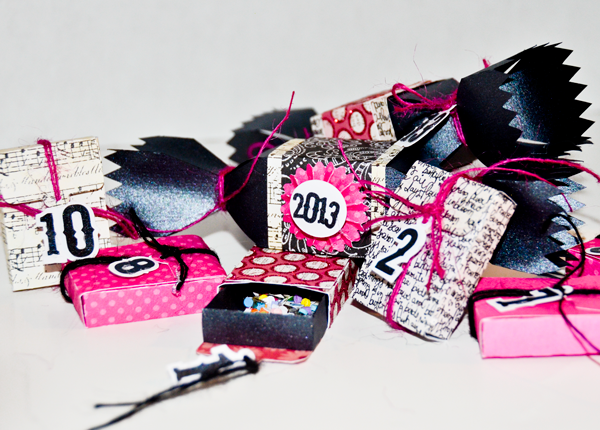
Looking for the perfect party favors this New Years? These candy poppers and matchbox confetti favors are cute, fun and sure to be a hit! Learn how to easily put these fantabulous favors together and how to cut fonts using Make-The-Cut and your digital cutting machine.
Materials:
Cracker Favor Box Cut It Set
Simple Match Box Cut It Set
LD Petticoat Twist
Accordian Fold Rosettes
Cardstock
confetti
candy
Candy Popper Directions:
Begin by cutting out and assembling your cracker favor boxes. Then embellish with strips of coordinating paper. For extra fun embellishments, cut out some Accordian Fold Rosettes and assemble, then add a circle with the year on top, or create year ties for the ends by following the directions below, on how to cut out fonts using Make-The-Cut.
Be sure to add some yummy treats!
Match Box Confetti Count Down Favor Directions:
Cut out and assemble your Simple Match boxes. I chose top 2 (or image 3), that had the hole cut into it. I sized these down so that when assembled they would be about 2 inches long. To make the fun, font numbers begin by opening Make-the-Cut and click on the text and fonts tab. I used LD Petticoat Twist for my font. You can use this, or choose another bold font.
Click on the Add text group and type in your numbers and be sure to select "Split by Glyphs." Click accept. The numbers will now be on your mat already split apart. We are now going to merge our "10" by selecting the two numbers, right click and select shape magic>weld.
Now go ahead and spread the numbers apart more. We are going to create the shadow layer for the background of the numbers. Make sure all your numbers are selected and then right click>shape magic>shadow layer. Then adjust the thickness to however you like, but make it thick enough that it can be a solid tag base.
Now turn off the top font layer by selecting the eyeball on the layers menu. And we are going to black out the bottom shadow layer so there are no spaces to cut by right clicking>shape magic>blackout. It should now look like this.
To create a tag circle for it to hang, begin by creating a circle. Do this by clicking on the shape icon at the top left. It's under generic.
Now create a second circle by copying the first (control+c) and pasting (control+shift+v). Now size it down a bit. This will be the center that we will cut out.
Center the smaller circle above the larger and right click>shape magic>boolean join.
Now place above the first number where you want to join it. Copy and paste the circle and place above each number thereafter. Select all the circles and the numbers, right click>shape magic>weld.
Cut out both layers of numbers, assemble and tie to your match box, then fill with confetti!


I know you did this with MTC, but I'm curious how you'd join the circles with the shadows in SCAL. Does anyone know? there's no boolean join option.
ReplyDelete