Showing posts with label teacher gift. Show all posts

Thursday, May 21, 2015

A Special Teacher Note


Our Confetti Class Graphic Set is perfect for making cute creative end of the year teacher gifts.

Create a fun note like this one for your little one to fill out. I used both the Confetti Class Graphic Set and the Confetti Party Alphabet.

Then for fun, I made my own envelope using our Design Envelopes Cut It Project and Confetti Paper Pack!

Slip in a gift card if you want to add a little something extra, but any teacher will be sure to love your child's heart felt answers on a fun gift like this!


Thursday, May 15, 2014

One more awesome teacher gift idea!

All I can say is "I wish I had thought of this!".  Brilliant!  And you know what makes this really special?  Getting your kids involved.  What teacher doesn't appreciate a little gift from the heart attached to an awesome gift card?  Visit Jin's blog to see more and get the instructions!


Thursday, May 8, 2014

More Appreciation Gifts

It's not too late to show your teachers how much you appreciate them. Or give something fun and special to your mom! Here are a few ideas to help you out.

Thanks a Latte for all you do with coffee gift card. Make this easy card with the Love you a Latte Cut Set or Graphic Set and Paper pack. Simply turn the cup sleeve into a pocket by not gluing it down completely. Add the words, "Thanks a Latte for all you do!" We used LD Blankie for the text.


 Gift the gift of pampering with this fun Toe-Taly awesome nail and polish kit! Use Layered Tags Cut It and LD Inventive for the font!
A supply of post-it notes for the busy mom or teacher. Tie together, and add the cute elephant and "just a note" tag from our Simple As Pie Cut It Bundle. Right now you can grab our entire Simple As Pie Cut It Bundle for just $15 when you use coupon code: MAYDAY at checkout.

Wednesday, April 30, 2014

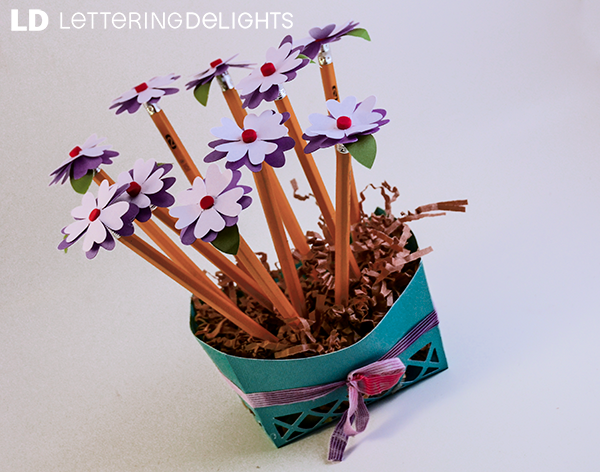
Pencil Flower Bouquet

Create a fun pencil bouquet using the Dimensional Flowers Cut It  and the No Handled Baskets Cut It from the Great Gift Giving Bundle. Easy to make and more fun to give!

Materials:

Dimensional Flowers Cut It Projects
No Handled Baskets Cut It Projects
Pencils
Crinkle shred
ribbon
floral foam block (optional)


Directions:

This arrangement pulls together pretty easy, however there are some slight adjustments you need to make to the flower to stick onto the pencil. I did this in Make-the-Cuts, but would be easy to do in any like program or even Inkscape.

Begin by bringing in the flower into Make-the-Cuts. I'm using the 3rd image from the Dimensional Flowers Cut It.  We will want to resize the flower down to about 2 inches by 1.8 inches. I have two flowers here so you can see the difference from the original size, but we also want to use the center of the original flower size, so you can delete everything on the larger flower except the center.
Next pull the image apart. I actually ended up deleting the smallest flower layer and only used the first two layers. So you should have the following pieces:
Take the center from the larger flower and copy it, so you have a total of 3. Place the center in the middle of the two flower pieces. Make sure you align and center them (select both images, right-click > align and space > align > align vertically, then do again and align horizontally). Also place a center over the leaf end as shown.
Now we will merge the centers with the piece underneath. (select both and hit control + w)
Now we will take the smaller center (which should be about .25 inches in diameter) and copy three times and place over the centers of each flower and leaf. (Make sure you align and center - see above).
Now we are going to select the center with the piece underneath and we are going to exclude the center using the Boolean join tool. (right-click> shape magic > boolean join > exclude). You can see what the result looks like on the flower on the right below.
Exclude the center on each flower and leaf. Then you can copy and cut as many flowers as you need.  And build flowers onto the end of each pencil.

Thursday, April 24, 2014

Teacher Appreciation Gift Ideas using the Great Gift Giving Bundle

Updated 4/30/2014:
With teacher appreciation week coming up May 5-9th, it's time to start thinking about some fun gift ideas. So to help you get started we've marked down our amazing Great Gift Giving Bundle valued at $170 to just $45, but with our coupon code Peanuts45 you pay less than $25 for 50 cuttable sets! Sale ends tonight at midnight, MST!

Create a fun Pencil Bouquet using Dimensional Flowers and the No Handled Basket. See more directions here.
Place a stack of Post-It Notes in one of the Square Gift Boxes. Cut out and attach one of the Layered Tags, to finish it off and add the phrase "Just a Note."
Our Framed Salutations Cards paired with a fun picture of your child and their teacher, create a memory and thank you that any teacher will cherish!
Or design a number of fun cards using any of the fun character sets in the Great Gift Giving Bundle.

Over Koala-fied Cut It:

Welcome to the Jungle Cut It:


Create any number of one of our stunning bird cages from the Caged Canary Cut It Set. Fill with a treat, or fun gift, or even just beautiful standing alone!
Make some homemade bath salts and place in one of these fun Flower Cups.

Simple Scented Bath Salt Recipe:
16 ounces all-natural bath salt
15-30 drops of essential oil

In a mixing bowl, add drops of the essential oil to the bath salt and mix well. Store in a glass jar. Add 1/3 to 1/2 cup of the scented salts to a bath for a soothing, luxurious experience!
S'mores for teachers that we just need "s'more" of!  Uses the Gift Giving Baskets Cut It set and the Welcome to the Jungle Cut Set.
Fill our Cubed boxes with any number of treats or gift. Add one of the Paper Gift Bows and a tag from Tagged Sentiments for a stunning gift!
The fox says..."Thank-thank-thank-thank-thank you!  Using our Foxy Boxies Cut It Set!
A Gift Card box perfect for any occasion with our Gift Card Box Cut It Set. Have your child decorate the gift card holder to make it more unique!
Grab this amazing bundle for less than $25 now using coupon code: Peanuts45 at check out!

Thursday, May 23, 2013

Thursday's Tip: Teacher Gift Ideas

Need some end of the year teacher gift ideas? Here are a few quick, easy and fantastic ideas your kid's teachers will sure to love!

Smart Cookie, using our new Tiskets and Taskets Cut it Set from the Great Gift Giving Bundle, just cut out and assemble and add the biggest best cookie you can find!

Teacher's plant seeds of knowledge that will grow forever! Create this beautiful gift with Paper Vases Cut it, Layered Tags Cut It, and Dimensional Flowers Cut It. Just cut out images and assemble. Glue flowers to floral wire and set in vase and fill with your teachers favorite candy! All Cut It sets are available in the Great Gift Giving Bundle.


Create this customized Gift Card Box with our new Gift Card Box Cut It Set, cut your gift card holder out of white card stock and have your child decorate to make it more special and more from them! Get the Gift Card Box on its own or in the Great Gift Giving Bundle!


We need "Smores" teachers just like you! Create this fun gift with the Gift Giving Baskets Cut It Set. Assemble, add graham crackers, a hershey bar and some marshmallows and you have a darling unique gift for the teacher you need smore of!


Make homemade bath salts and put in one of the Flower Cups Cut It Set add a Dimensional Flower to the top, and you have a beautiful and thoughtful gift your teacher can really enjoy!

Thursday, May 24, 2012

Thursday's Tip: Monster Clips and Teacher Gifts

The school year is coming to an end. Have you thought about how to show your appreciation to those impressive educators in your life?  When I asked my son what he wanted to get his teacher, he thought really hard then said, "How about a box of marshmallows?" Then I said, "Well she might not like marshmallows as much as you, but we can get her a box of something." So we set to work.

Materials:
Animal Boxes and Bags SVGs 
Monster-licious Cupcake Toppers or other LD graphics
Card stock
Brads
Twine
Paper Clips
Sewology Cover Buttons
Candy or other various items to put in your boxes

Monster Clips:
They don't actually doesn't have to be monsters, there is a lot of cute graphics you could use as well, I just love these images, and felt it best represented my son. I began by downloading and opening up each of the Monster-licious Cupcake Toppers in Photoshop or like program. I got the 3/4" sized buttons, so I sized down the toppers to 3/4" so that I know that the whole of the image would show on the button top. I then created a 75 pixel stroke around each circle so that I have enough color to wrap around the edge of the button.
To stroke each layer, double click on the layer you want to stroke in the layer menu. When the layer style box pops up, click on stroke on the bottom left hand side. You will see the options in the middle change, now adjust the size to about 75 pixels. Then go down to the bottom center of the layer style menu and click on the color swatch box. A color box will pop open and you will automatically get a little dropper tool that will enable you to select a color from the image you are working on. I went ahead and selected the base color of each topper to extend each one.

Once each layer is stroked, go ahead and print the sheet then cut out the images. The nice thing about using these cover buttons is that they don't have to be cut out perfectly. In fact I just cut each image into a square. To ensure I got the button where I wanted it, I made an impression of the button around the edge of the image. Like this:
Then you place your image face side down and the button on the back and insert it into the button shield mold. Hold securely and tuck the edges of the paper around the back of the button. Position the back of the button and use the pusher to press down until you hear it snap into place.
Then use a hot glue gun to glue the paper clip to the back of the button.


Multi-Gift Box:

Begin by cutting out four of the boxes from the Animal Boxes and Bags SVGs. I first sized them down so that they would be about 2 inches square each. Assemble each box:
 Once you have all four assembled, then use your hot glue gun to glue them all together.
I made fasterners on each of the boxes by using a small paper punch to punch holes through the top of the lid and attached my twine, making a loose loop, then inserted a brad into the bottom half of the box.
Then go ahead and fill your box, with goodies, teacher supplies or whatever else you can think of. Add a little tag, and you have a fun little and unique gift!